Multi-Color Heat Transfer Tutorial

I meant to share a more detailed tutorial on this multi-color, flocked heat-transfer project that was featured as a design-team post in February. My, how time flies!
The original, condensed version of this post was featured on the Silhouette blog. Here are more details to explain the template I created and how I worked with multiple colors. You can find this word-art cutting file by Kolette Hall in the Silhouette design store {here}.
Silhouette’s heat transfer comes on its own transfer-tape backing, so normally you just reverse the design in Studio, feed it into your machine with the shiny-side down, cut it, weed it, then iron it onto your fabric. The trick with this project was lining up multiple colors and cutting large phrases to fit a 16” x 20” art board. I decided to use extra transfer tape to hold the weeded pieces all in position relative to each other.
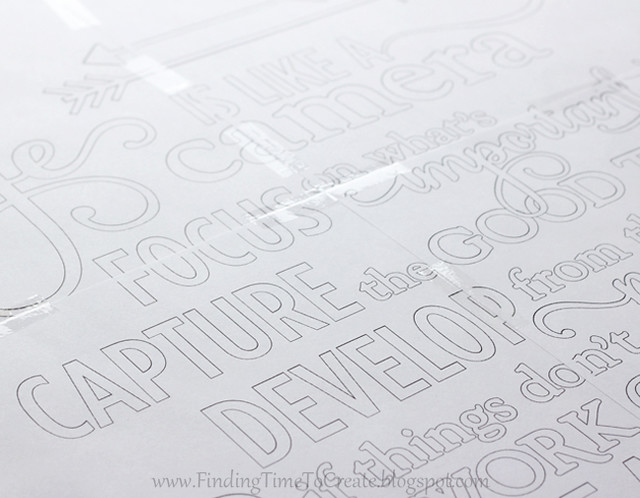
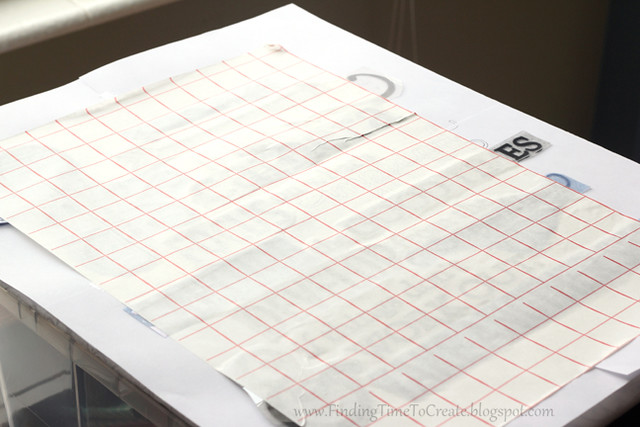
First, I printed a full-size template on printer paper. Since I don’t have a printer that prints 16” x 20”, I printed it in four pieces and taped it together. Here’s how:
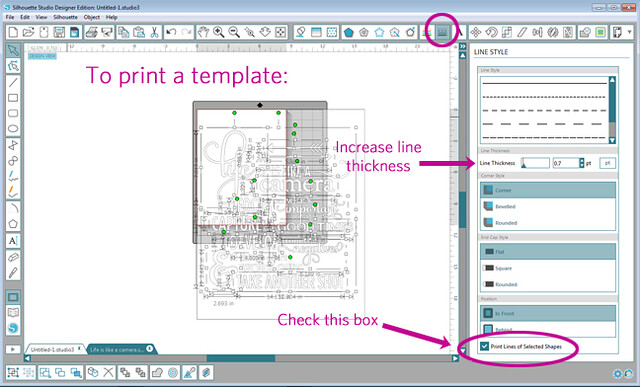
1- Be sure to set your lines to “Print lines of selected shapes” in Studio (Line Style Window). You can also thicken up the lines to about 0.5 or more so they print darker (also in the Line Style Window). This is assuming you use no fill color.
2- Draw a background with your Rectangle Drawing Tool that is representative of the art board (16” w x 20” h). Group the full word-art design with that rectangle so it stays centered.
3- Set your Page Size (Design Page Settings Window) to Letter (or whatever size you are printing on).
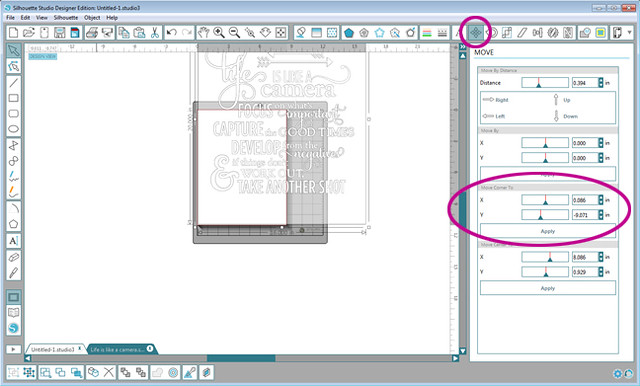
4- Use your tools in the Move Window to line up your different segments to print, one page at a time. Make the upper left corner go to 0”, 0” and print. (In Move Corner To, type X=0”, Y=0”, Apply.)
After printing, make the lower left corner match the lower left corner of your page. For letter-size paper, type X=0”, Y=-9”, and print. Tip: You can always drag your design to approximately the right spot, then adjust your input numbers to be exactly what you want (e.g. change 0.094 to 0.0 and change -9.654 to -9.0).
For the third template section type X=-7.5”, Y=0” in Move Corner To, then print.
The final template section should be X=-7.5”, Y=-9.0” for letter-size paper.
With those four printouts, line up the overlapping areas and tape it all together (it’s helpful to use sunlit window or a lightbox to see the lines through the paper). You now have a template for your multiple pieces of heat transfer material.
Now for cutting the heat transfer.
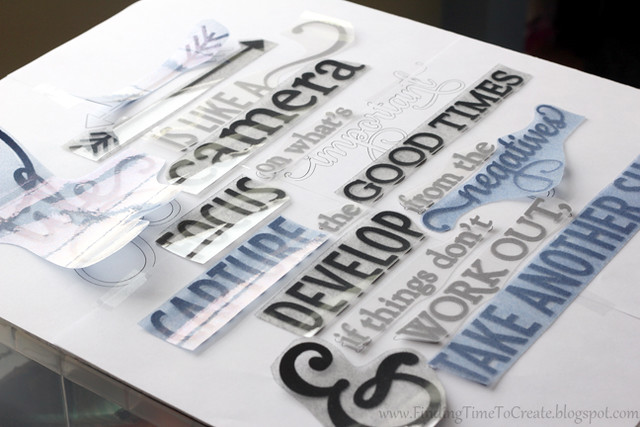
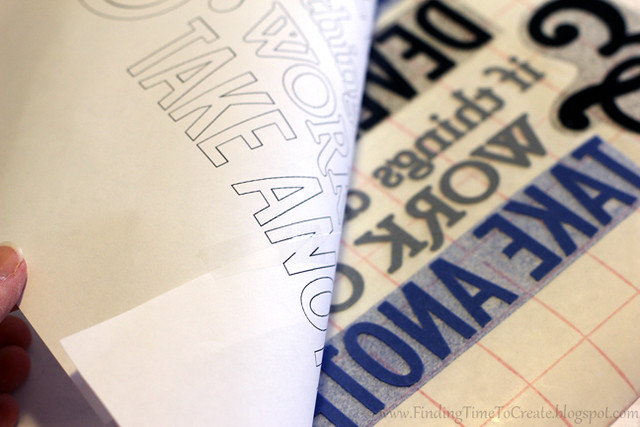
I filled the different words/phrases in Studio with color to represent the color of flocked heat transfer I wanted to use (grey, black, blue). Separate your colored words into groups for cutting. Make sure the line thickness is back to 0.0 (Line Style Window) and make sure you’re cutting the mirror image of the words.
You’ll cut them with your Silhouette machine (all the blue together, then the grey together, then the black), then trim them apart with scissors and weed the excess material away before lining up on your template. You don’t want any layers of transfer material (or the backing) to overlap, so trim closely to the words where necessary.
Line up the transfer material onto your printed template. (The word “important” overlaps another word on the design, so I just saved it to iron in place after all the other words were done.)
Because my design was so big, I used a large piece of regular vinyl transfer tape (12”) to pick up all the pieces together. I started by sticking the opaque transfer tape directly to the paper template below the words, then carefully pushed it down a little at a time to stick to the heat transfer pieces, being very careful not to shift them.
Once all the pieces were stuck to the transfer tape, I flipped it over and peeled the paper template away from the transfer tape and heat-transfer pieces. Once the paper was out of the way, I placed the design on the center of my fabric-covered 16” x 20” board.
I ironed directly onto the opaque transfer tape (you could also put a thin piece of fabric down to iron on top of). The directions for flocked heat transfer material say 45-60 seconds. That seems like a long time, but it really is necessary to heat through and get the transfer material to stick. I go over every area for about 30 seconds at a time, then go over it all again another 30 seconds.
When the heat transfer material starts to stick, you can peel away the opaque paper transfer tape and continue heating and re-heating specific areas that aren’t yet sticking. Eventually, every word will stick to your fabric and you can peel away all the clear transfer backing. All done!

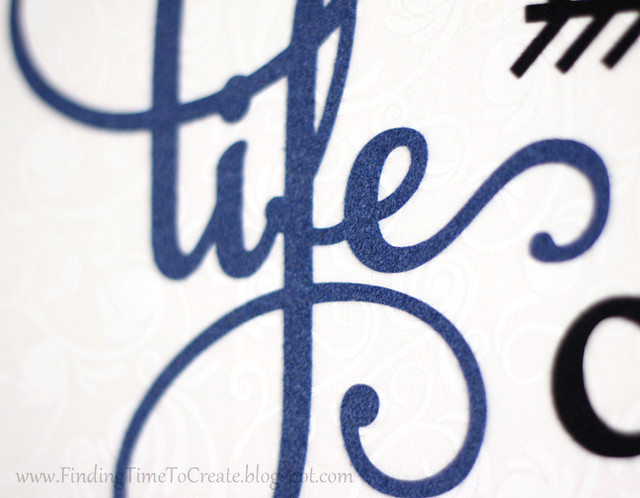
This really is a beautiful piece. The texture of the flocked vinyl is so luxurious! Photos can’t quite do it justice, but here’s a closeup anyway.
I hope this tutorial helps alleviate any concerns of tackling a large-scale project like this. Please let me know if you have any questions!


Thank you Kelly! I have a feeling this is a project I am going to refer back to time and time again. Thank you for taking the time to share all the details of this great project!
You're welcome, Marilyn! Thanks for the nice comment. 🙂
I got my Silhouette about 2 years ago. Every time I was struck with a "have to try" project that caught my eye…who's name was on it….YOURS. Thank you for your great and inspiring projects over the last 18 months with Silhouette!
Donna Farmer