Sketched Winter Card
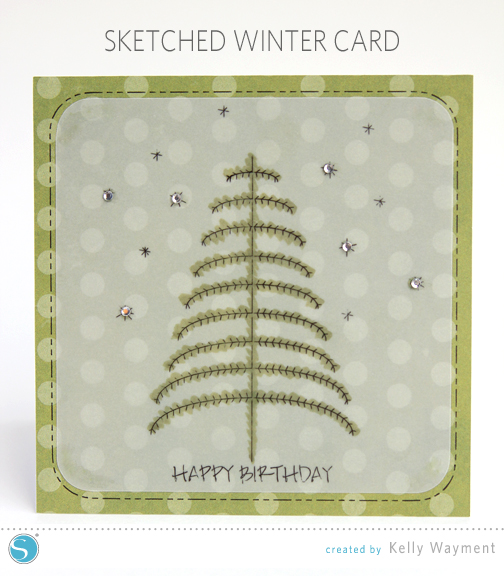
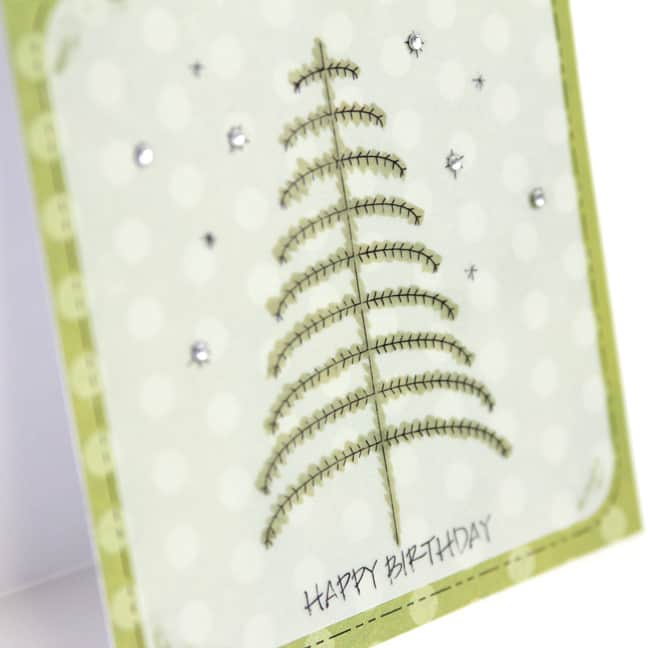
Hello, Silhouette fans! I used this week’s free design to make a simple sketched winter card. We have several winter birthdays in our family, and I think this design is great for cards.
I sketched the tree with its snowflakes and a sentiment on vellum, added color to the back with marker, then added another sketchy-looking border to my green pattern paper before cutting it as well.
Note 12/13/2019: The tutorial below uses Silhouette Studio v 3 for a single tool holder. For updated software techniques when sketching, watch my Sketch Pen class here. It uses Silhouette Studio v 4.3.
How-to:
The tree design is resized here to approximately 3.64” W x 4.05” H. I used my Text Tool to type out “Happy Birthday” in all caps with Jeana Sketch font. I created a rounded rectangle exactly 4.5” square with my rounded-rectangle drawing tool (hold Shift while dragging a red corner dot to alter the roundness of the corners). I created a 0.066” offset of the rounded rectangle and then changed its Line Style to a funky dashed line. Finally, I drew a 5” square for the card base with my rectangle drawing tool.
I put the sentiment and tree design on the smaller rounded rectangle to be sketched and cut from vellum, and I centered the larger dashed-line rounded rectangle on the square card base to be sketched and cut from pattern paper.
Once the designs were sketched and cut, I colored behind the tree on the back side of the vellum with a marker. (You can color directly on Silhouette-brand sketched designs with markers, but I wanted a softer look to be seen through the vellum.) I also added a few rhinestones to make my snowflakes sparkle.
Are you new to sketch pens? Read on…
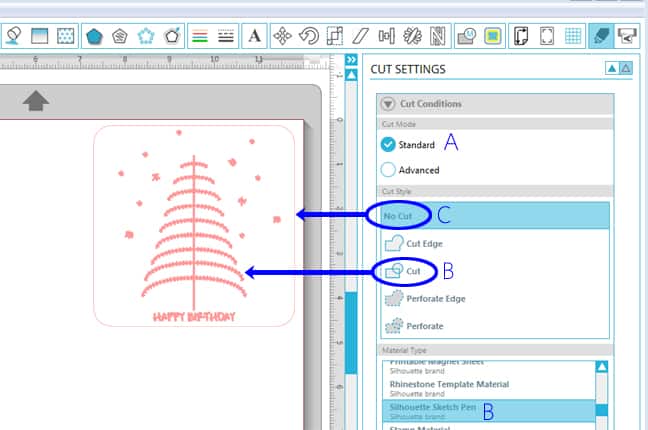
You can sketch and cut in Silhouette Studio a couple of different ways. Both ways are set up in your Cut Settings Window. This process is assuming you are using one color of sketch pen that will sketch on a shape to subsequently be cut from paper. (It’s easy to sketch multiple colors once you know what you’re doing, but I won’t include that here.)
Method 1:
- Set the Cut Mode to Standard. (See A in the image below.)
- Select the design to be sketched (everything to be sketched should be grouped with each other, and everything to be cut should be grouped with each other—in my example there’s only one shape to be cut so grouping doesn’t apply). You won’t group the sketched part with the cut part.
- With the sketch design selected, choose Cut for the Cut Style. Also select Silhouette Sketch Pen for the Material Type. (B)
- Now select just the cut shape, and choose No Cut for the Cut Style. (The preview will show the sketch design in bold red and the cut design as a faded outline.) (C)
- Put your paper (or vellum, etc.) on the mat and load it into the machine.
- Make sure your sketch pen is in the blade holder.
- Choose Send to Silhouette.
- When your Silhouette is done sketching, DO NOT UNLOAD THE MAT.
- Instead, select your sketch shape and choose No Cut, then select your cut shape and choose Cut. (The preview will show the sketch design as a faded line color and the cut design in bold red.)
- Change the Material Type to the type of paper you have just sketched on (vellum, pattern paper, etc.).
- Remove the pen and put in the blade (at the correct setting for that material).
- Choose Send to Silhouette.
Done!
Method 2:
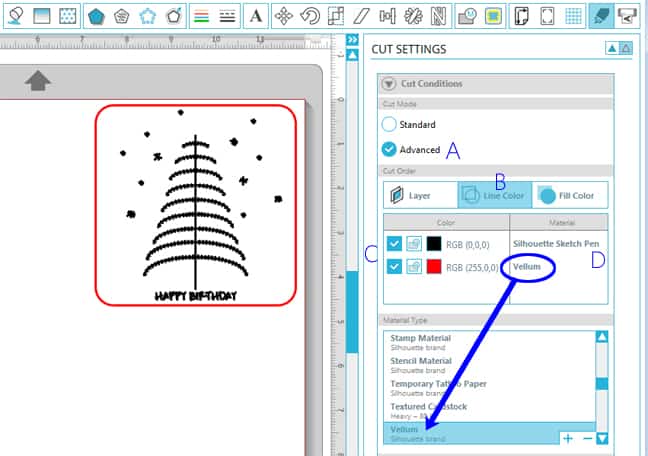
- Make sure everything to be sketched is one line color (black in my example) and that everything to be cut is a different line color (red in my example). It doesn’t matter how it’s grouped, so I usually group the whole thing so it’s easier to move around on the page.
- Set the Cut Mode to Advanced. (See A in the image below.)
- Set the Cut Order to Line Color. Your preview will show everything as a bold cut line, but in the different line colors you designated. (B)
- Make sure the sketch portion’s line color in the Cut Order is above the cut portion’s line color so it will sketch before it cuts. (C)
- Click on the colored box (or to the right of it) to select that line color’s Material Type. In this example, choose Silhouette Sketch Pen for the black sketch color and Vellum for the red cut color. (D)
- Add a Pause between the sketch and the cut by right-clicking on the top line (black box) and then clicking Add Pause on the popup. Now your machine knows to wait after sketching so you can swap out the pen for the blade.
- Load your paper (or vellum, etc.) on the mat into the machine, make sure your sketch pen is in the blade holder, and choose Send to Silhouette.
- The Silhouette will sketch its design and then freeze instead of returning to home base. On your cut screen it will tell you it’s paused. This is when you take out the pen and replace it with the correctly-set blade. Leave the mat alone.
- After you’ve done that, click Resume Cutting. (Do NOT click Start.)

The machine will now do the cut portion, and it’s finished!
If you haven’t used your sketch pens yet, or haven’t used them much, why don’t you give it a try with this week’s freebie? You can try out both methods above and see which way you like better.
This post originally appeared on the Silhouette Blog as a design-team project.
Designs Used:

