Watermelon Dish Towels
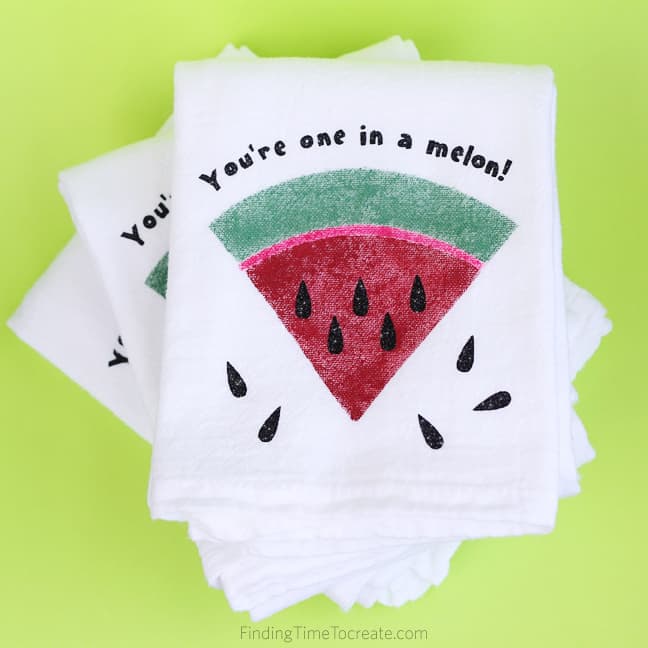
For this week’s free design from Silhouette America, my goal was a quick and easy project. Watermelon dish towels! By the way, have you grabbed this watermelon design yet?
I decided to decorate multiple dish towels with the same design in fabric ink, so Silhouette’s thick stencil material was my best choice. I could have done the same process with stencil vinyl, which is much thinner, but the stencil material let me cut once and use less material by re-using the same stencils three times. It’s sticky on the back, so it holds tightly against the fabric when applying fabric ink.
You will need:
(Some affiliate links.)
- Adhesive-back stencil material (not the same as stencil vinyl)
- Fabric ink (green, magenta, red)
- Black glitter heat transfer material
- Plain white flour sack dish towels
- Silhouette machine (CAMEO, Portrait, or Curio)
- Scrap chipboard or cardboard
- Sponge or foam applicator
- Iron or heat press
To prepare the watermelon design:
- Ungroup the watermelon pieces and arrange them to look like the final design.
- Select all the pieces and resize the whole design so the widest part will fit on your hand towel when folded. (My hand towel is about 5 inches wide when folded, so my green watermelon rind is 4.275 inches wide.)
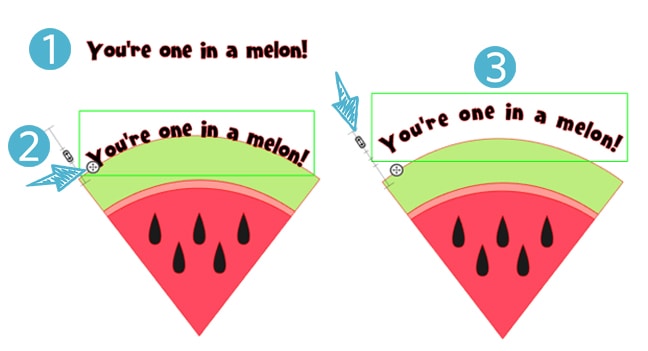
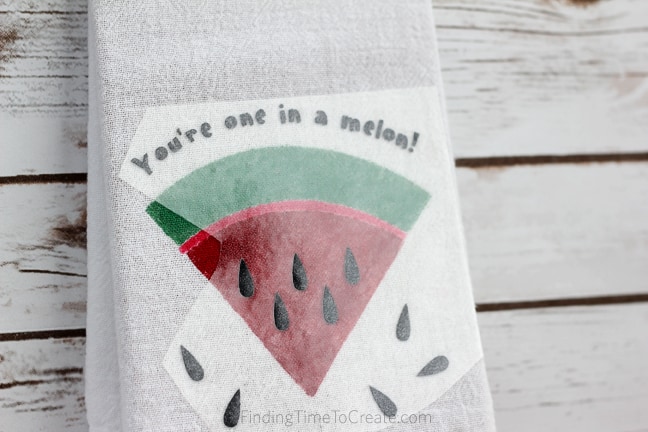
- Use the Text Tool to type “You’re one in a melon!” in a fun font, like PN Fineapple. Mine is about 40 pt size to fit my resized watermelon. (See #1 in the image below.)
- In text-edit mode (surrounded by a green box with a flashing cursor), click and drag the small four-pointed arrow so the text “snaps” to the top of the watermelon rind. (See #2 in the image below.)
- Now click and drag on the small slider bar to pull the text upwards and leave a space above the rind. (See #3 in the image below.)
- Adjust the text size and spacing as necessary. When you are satisfied with the text, right click on the text and choose Convert to Path. The text will no longer be able to be edited, but it will also prevent it from losing its curved shape when moving it around.
- For a little whimsy, duplicate the watermelon seeds, then ungroup the extra set and individually rotate them and scatter them under the watermelon.
- Group all of the text and seeds together, then flip horizontally for cutting with heat transfer.
- Glitter heat transfer can be cut using flocked heat transfer settings (blade 3, speed 5, thickness 33 works for me).
To make re-usable stencils with this watermelon design:
- Spread the three watermelon sections out to work on the pieces individually.
- (Optional) Turn on your Grid to help with the next step.
- Draw a rectangle around each watermelon segment so there is at least an inch of border all around. (If you’re a really messy painter, you may want to leave an even larger border.)
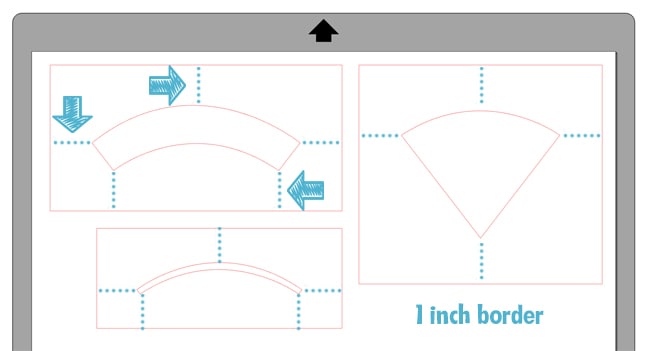
- For each watermelon segment and its border, center it (Align Window: Align > Center), then Group it with its border.
- These three stencils can be cut with any Silhouette CAMEO, Portrait, or Curio. (Make sure you choose stencil MATERIAL and not stencil VINYL if you are cutting this with the thick stencil material!)
To paint the cloth with fabric ink and your stencils:
Watch this video (recorded at 6x speed), or follow the instructions below.
- Insert a scrap of chipboard or cardboard under the layer of fabric you will be painting.
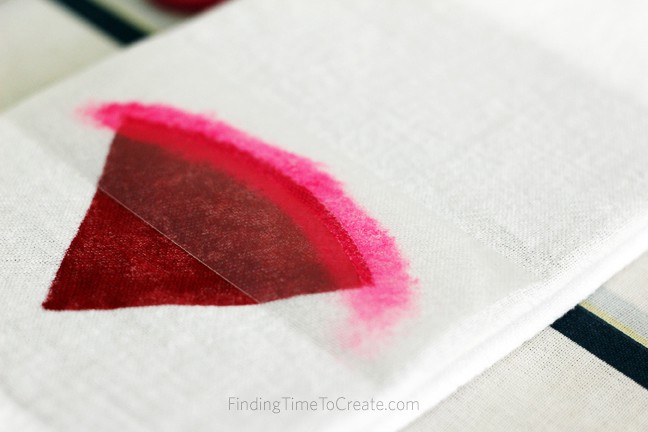
- Place the stencil for the lowest piece on your towel, leaving enough room for the scattered seeds.
- Dab the darker red ink on the exposed fabric until it is filled in to your liking.
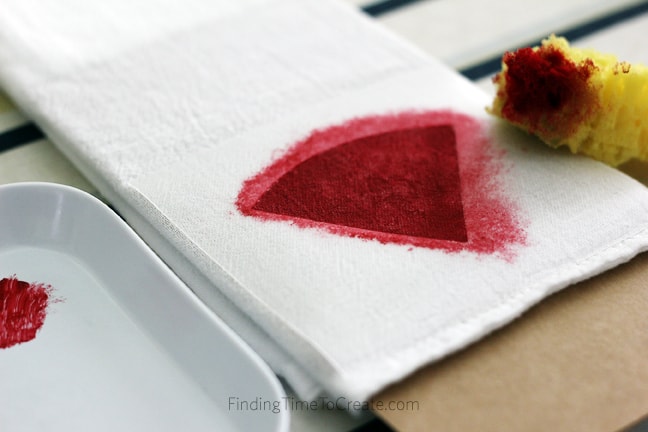
- Peel off the stencil and save it for the next use.
- Wait for the fabric to dry, or hit it with some hot air from a hair dryer to speed the process.
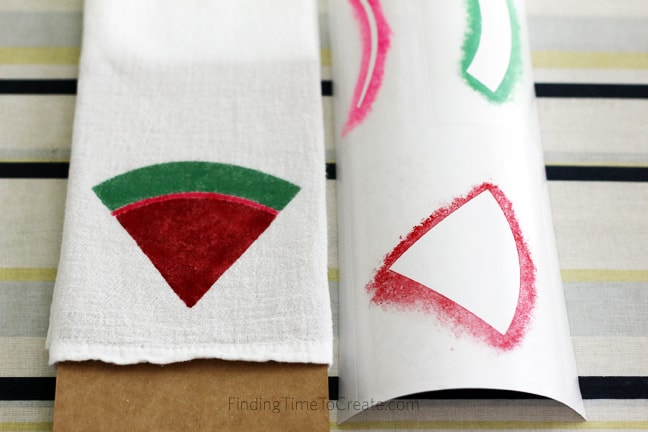
- Line up the next stencil above the lower inked area and paint it with magenta fabric ink.
- Peel off the stencil, dry with hair dryer.
- Line up the final stencil above the previous inked area, ink it with green, peel off the stencil…(you know the drill).
- Each of these stencils can be saved on its backing and used multiple times.
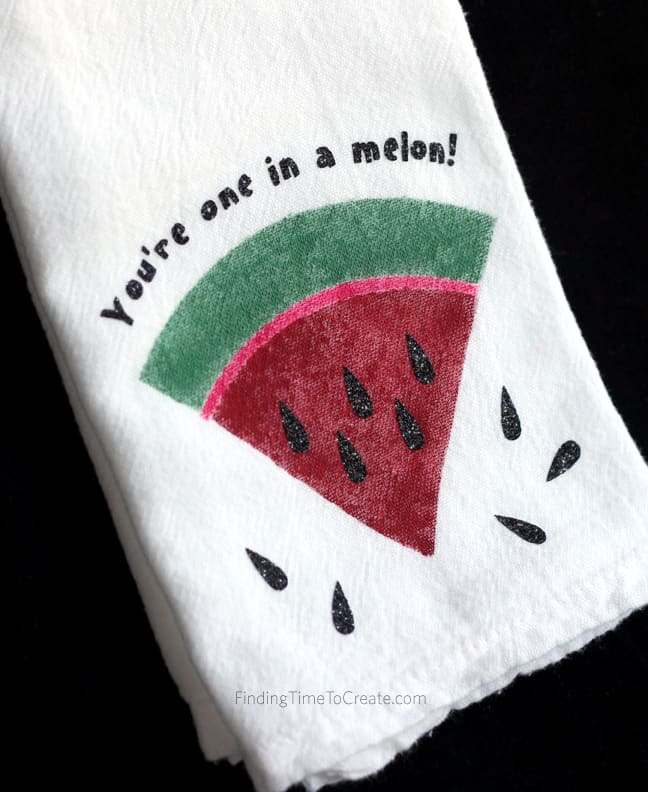
- Once all the fabric ink is dry, position the weeded black heat transfer material on top of the painted watermelon and iron it in place.
Now you can make a “melon” of these to share with your friends!
Designs and Fonts Used:
Free watermelon design from 6/21/16 (design ID #138518)
PN Fineapple font (design ID #120533
This post contains affiliate links. It won’t change your price, but it helps you by getting exactly the product I used, and it helps me by giving me a little kickback to help support this blog. Win-win. 🙂


These are so cute! Thanks for sharing the tutorial and fun video 🙂
Thanks, Terrie! So glad you like it. 🙂